
Anime Crusaders X Combat Mechanics
Match your attackers to enemy weaknesses, cover the route with the right attack shapes, and spend Yen on placements and upgrades. Use the combat panels to check what each unit is doing before adjusting your defense.
Physical or Magic damage and elemental labels are separate. True Damage ignores resistance. Against Flying enemies, Ground units deal 33.3% damage, Hybrid units deal 66.6%, Hybrid units on a Hill deal 100%, and Hill units deal 150%. Reserve unaffordable placements with Phantoms, inspect the next upgrade before buying, and choose whether to keep upgrades when repositioning.
Damage types, elements and Flying enemies
Damage types and resistance
Read both the unit's Physical or Magic damage type and its elemental label. Hover those labels for their tooltips. Element names include Blaze, Tide, Thunder, Frost, Tempest and Blossom.
Enemy weaknesses increase damage from the matching element; resistance reduces it. Thunder attacks, for example, deal less damage to Thunder-resistant enemies and more to enemies weak to Thunder. True Damage ignores resistance everywhere in the game.
Inspect the enemy's current modifiers before deciding which attacker to upgrade. During The One trial, an enemy displaying +50% Blaze weakness takes 50% more damage from Blaze units, while an enemy displaying +20% Dark Weakness takes 20% more damage from Dark units. Apply the percentage on that enemy's tooltip.
Blaze Resistance reduces damage received from Blaze units. Removed Blaze Resistance stays removed, and its value cannot fall below 0.
Damage against Flying enemies
Read the Flying-enemy warning when starting a stage. The attacker's placement type and actual position determine its damage against Flying targets.
| Attacker | Placement | Damage dealt |
|---|---|---|
| Ground | Ground | 33.3% |
| Hybrid | Ground | 66.6% |
| Hybrid | Hill | 100% |
| Hill | Hill | 150% |
Place a Hybrid on a Hill when its position still covers the route: this raises its Flying damage from 66.6% to 100%. Hill units receive the strongest placement-type multiplier against Flying enemies. Ground units still damage Flying enemies, but their 33.3% multiplier makes them a costly choice for handling that threat alone.
Anniversary number scale
The Anniversary combat rescaling divided both unit damage and enemy health by 25, preserving their balance. Compare damage and health from the same scale when reading older values.
Critical hits and stage boosts
Critical hits
Critical hits are rolled per hit, rather than separately for each enemy. Every enemy struck by that hit shares its critical result.
Base Crit Damage adds 50% to a non-critical hit. Additional Crit Damage adds to that base: a +10% Crit Damage bonus produces +60% Crit Damage, so a normal critical hit deals 160% of its non-critical damage.
At 50% Crit Damage, the critical tiers are:
| Result | Extra damage | Total damage | Indicator |
|---|---|---|---|
| Crit | +50% | 150% | ! |
| OverCrit | +150% | 250% | !! |
| SuperCrit | +250% | 350% | !!! |
Crit Chance above 100% allows the same hit to reach higher critical tiers. Read the selected unit's current Crit Chance and Crit Damage before comparing its critical output.
Stage boosts
Stage boosts affecting the same stat multiply with one another:
Combined stage multiplier = m1 × m2 × …
Each m is an applicable stage-boost multiplier for that stat. Use this rule for stage boosts; unit passives and other effects retain their own stacking conditions.
When placing a buffer, use the circles around buffable units to check coverage. Units already receiving the buff also display an indicator.
Targeting and attack coverage
AoE attacks lock their aim when the attack starts. Choose a position that gives the attack useful coverage from that starting aim.
| Attack or target | Hit behavior |
|---|---|
| Line | Keeps its starting direction |
| Cone | Aims directly at its target |
| Large enemy | Size counts toward collision |
A large enemy's center is not the only point checked for a hit. Judge coverage using the attack shape and the enemy's body.
Select Priority in the unit panel or Unit Manager to change target selection. Target-priority shortcuts also provide access to First, Strongest, Bosses and other available priorities. Use the priority that directs the attack toward the threat or route segment you need to cover.
Before placing or moving a unit, inspect its range circle and AoE preview. Both remain visible through walls, making them useful for checking bends and obscured parts of the route.
Boss Lair applies separate restrictions: units have 50% range, and Full AoE attacks deal 30% less damage. Account for those changes when choosing positions in the Boss Lair guide.
Place Phantoms and buy upgrades
Reserve a placement with a Phantom
- Select a unit available in the current match.
- Position its placement preview so its range and attack shape cover the intended route.
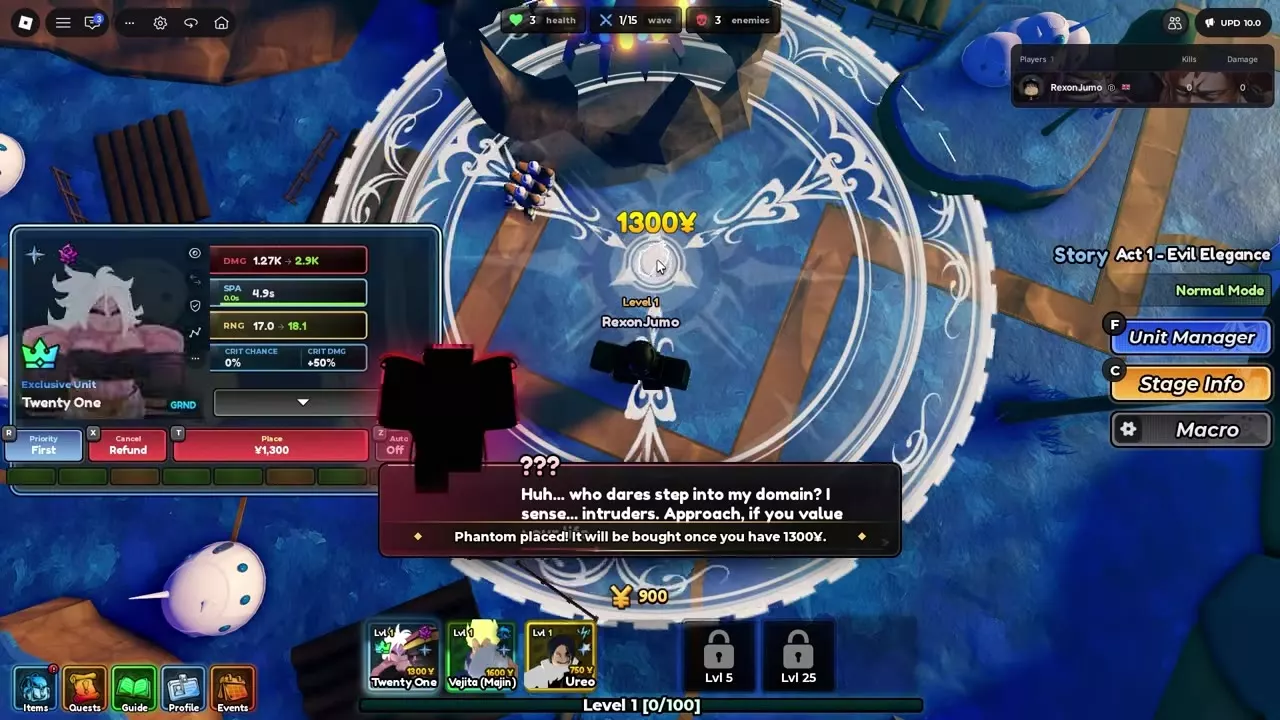
- Place the unit. If you lack the required Yen, Phantom Placing reserves that position.
- Accumulate the displayed deployment price. The reserved unit is purchased and placed automatically once you can afford it.
- Open Unit Manager to inspect pending Phantoms and cancel an unwanted reservation. The Phantom's panel also offers Cancel/Refund.
For example, in Planet Namak Act 1 on Normal, Twenty One costs 1,300 Yen to deploy. With 900 Yen available, place her Phantom first; she deploys when the available balance reaches 1,300 Yen. Reserving the position does not provide an active defender before the purchase.
A placement ghost stays visible until the unit has fully loaded.
Inspect and buy match upgrades
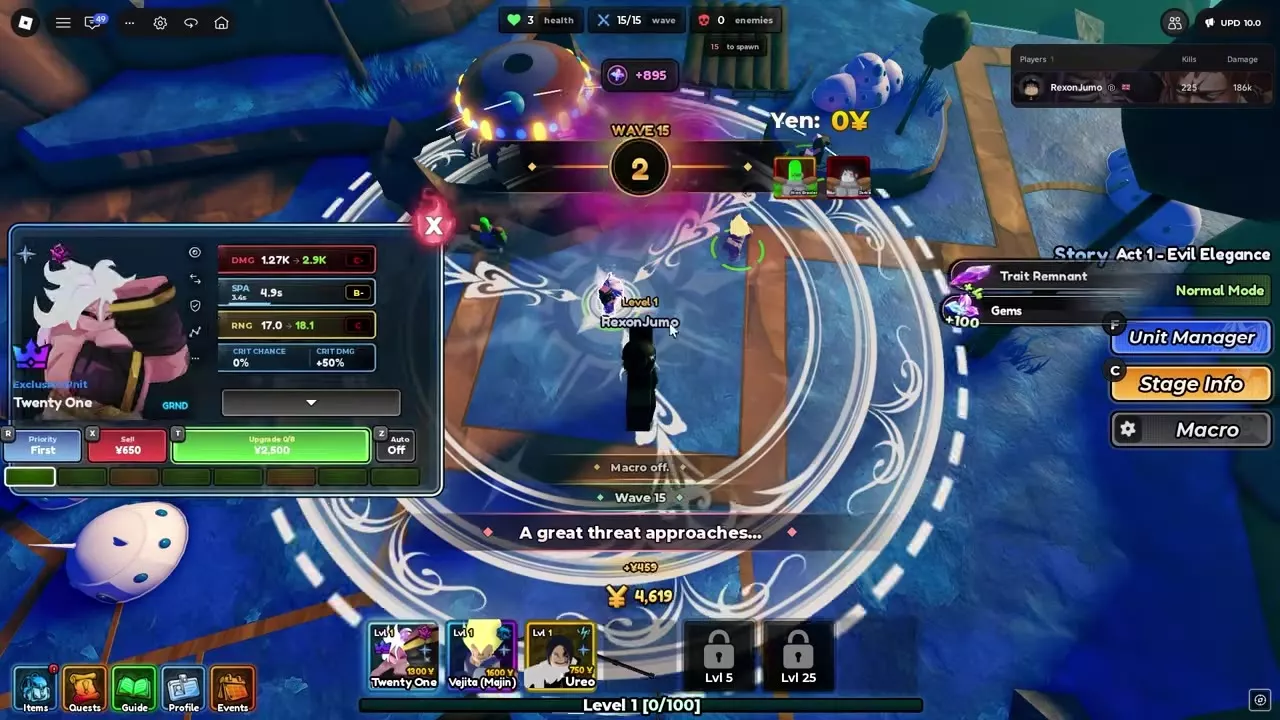
Select a deployed unit, or open Unit Manager from the combat HUD. Its default shortcut is F. Check the current upgrade progress, next Yen cost and current-to-next DMG, SPA and RNG values, then press Upgrade when you can afford it. MAX marks completed match upgrades.
Hover an upgrade pip to inspect the range that upgrade gives. Use the card's affordability fill to spot upgrades you can currently buy. Favor an upgrade that solves the immediate problem: additional coverage helps with missed route sections, while damage and attack-interval changes affect how quickly enemies are cleared.
In Twenty One's Upgrade 0/8 example, the first upgrade costs 2,500 Yen. After buying it, progress becomes 1/8 and the next displayed cost is 4,000 Yen. Read the next price after each purchase when budgeting a sequence of upgrades.
Auto controls and Collection previews
- N: the Anniversary Auto upgrade shortcut acts instantly.
- Auto button or Z: on servers with the November 16, 2026 Auto-button update, cycles P1 → P2 → P3 → P4 → P5 → P6 → Off.
N and Z perform distinct operations.
In Collection, hover upgrade pips to inspect individual costs, cumulative costs, stat changes and new attacks. Click a pip to preview that upgrade's stats; selecting a preview does not purchase a match upgrade. Collection levels are a separate form of growth, covered in unit leveling and Collection management.
Reposition with or without upgrades
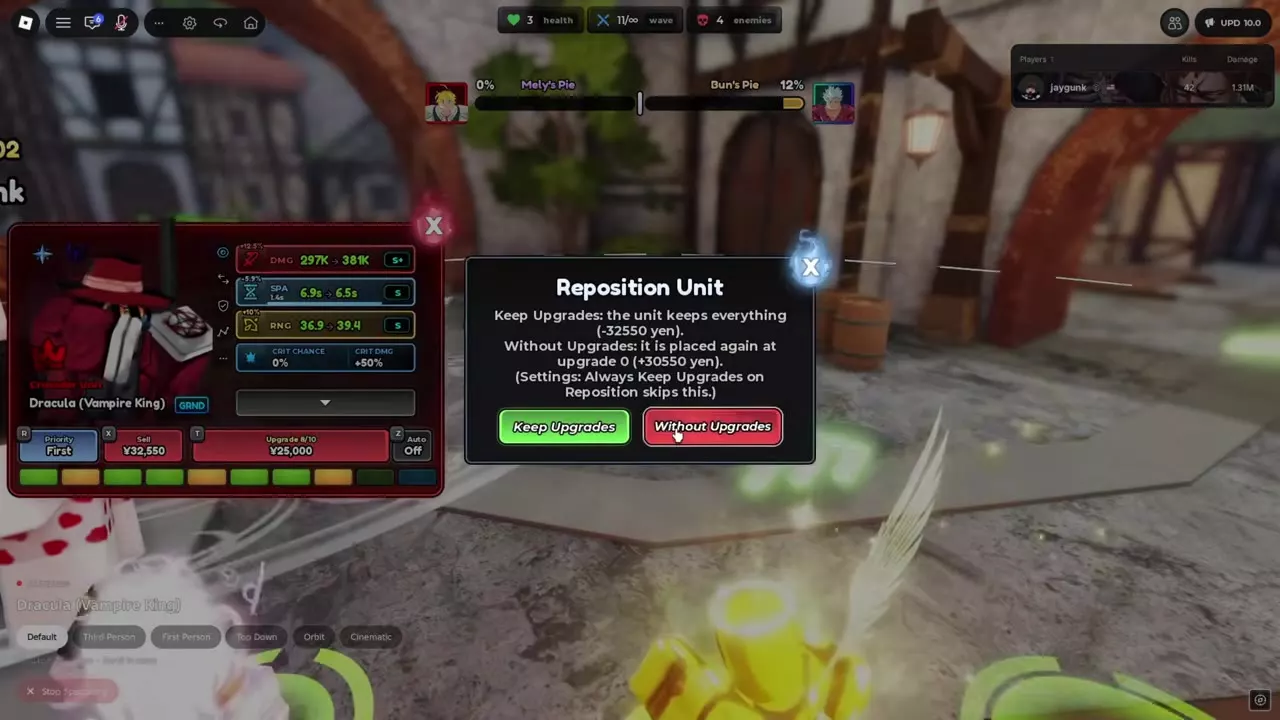
Open Reposition Unit from a deployed unit's panel and choose how to handle its upgrades.
| Option | Upgrade result | Yen change |
|---|---|---|
| Keep Upgrades | Retains all upgrades | Pay displayed cost |
| Without Upgrades | Resets to Upgrade 0 | Receive displayed refund |
Choose Keep Upgrades when you need the unit's upgraded attack immediately at the new position and can afford the move. Choose Without Upgrades when recovering the displayed Yen is worth rebuilding the unit from Upgrade 0.
- Compare the cost and refund in the Reposition Unit window.
- Select Keep Upgrades or Without Upgrades. A paid move requires enough Yen; selecting Keep Upgrades without it leaves the move incomplete.
- Pick the new position using the range circle and ground markers.
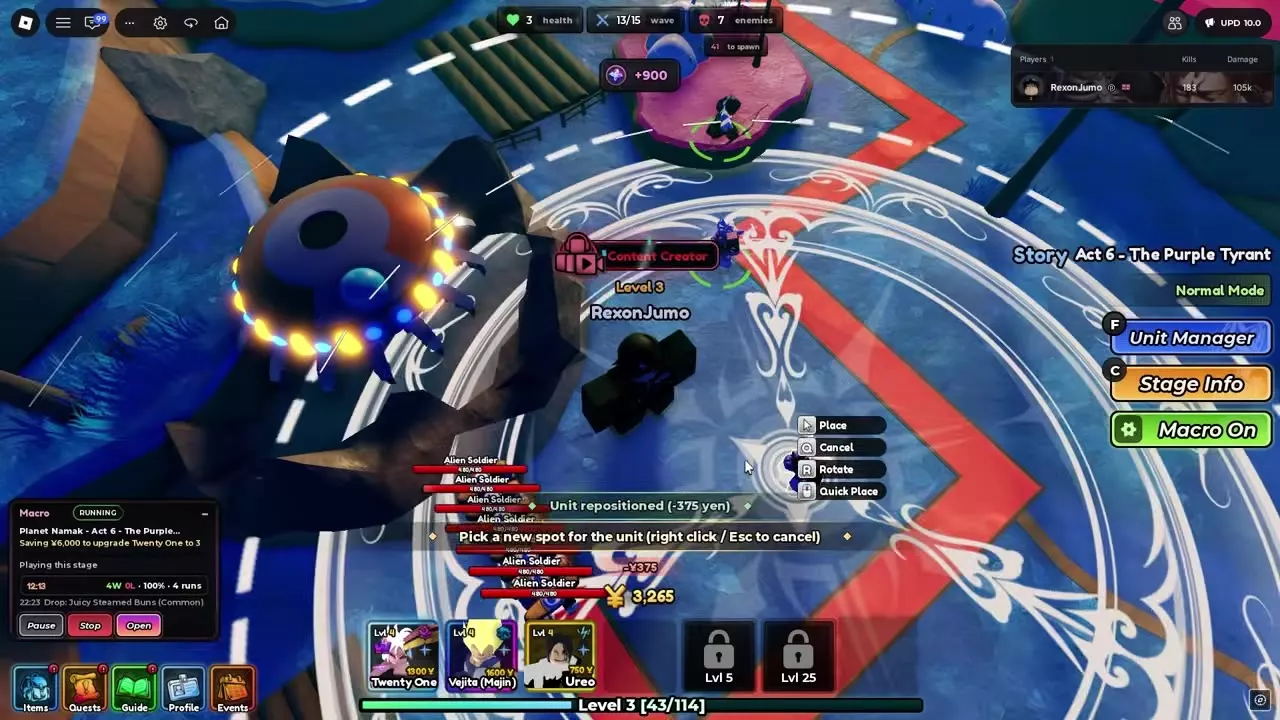
- Use Place, Rotate or Quick Place to finish positioning. Right-click or press Esc to cancel.
Costs depend on the selected unit's current window. In the Twenty One example from Story Act 6 on Normal, Keep Upgrades costs 3,900 Yen and Without Upgrades returns 2,600 Yen. In Dracula (Vampire King)'s Kitchen Madness example, the choices are a 32,550 Yen cost or a 30,550 Yen refund. Both refund options reset the unit to Upgrade 0.
Enable Always Keep Upgrades on Reposition to skip the Keep Upgrades versus Without Upgrades selection window. Boss Lair uses a separate free Move action.
Read buffs, damage and stage information
Choose the right combat readout
| Readout | Main use |
|---|---|
| Team Damage | Damage dealt by each unit |
| Team cards | DPS and cost |
| Unit window | Next-attack countdown |
| Unit Buffs | Current effects and sources |
| DPS Check | Current damage breakdown |
| Stage Info | Match progress and rewards |
Team Damage reports damage each unit has dealt during the match. Position, target access and time spent attacking affect that total, so use it to judge the current defense rather than treating it as a theoretical damage ranking.
Inspect Unit Buffs
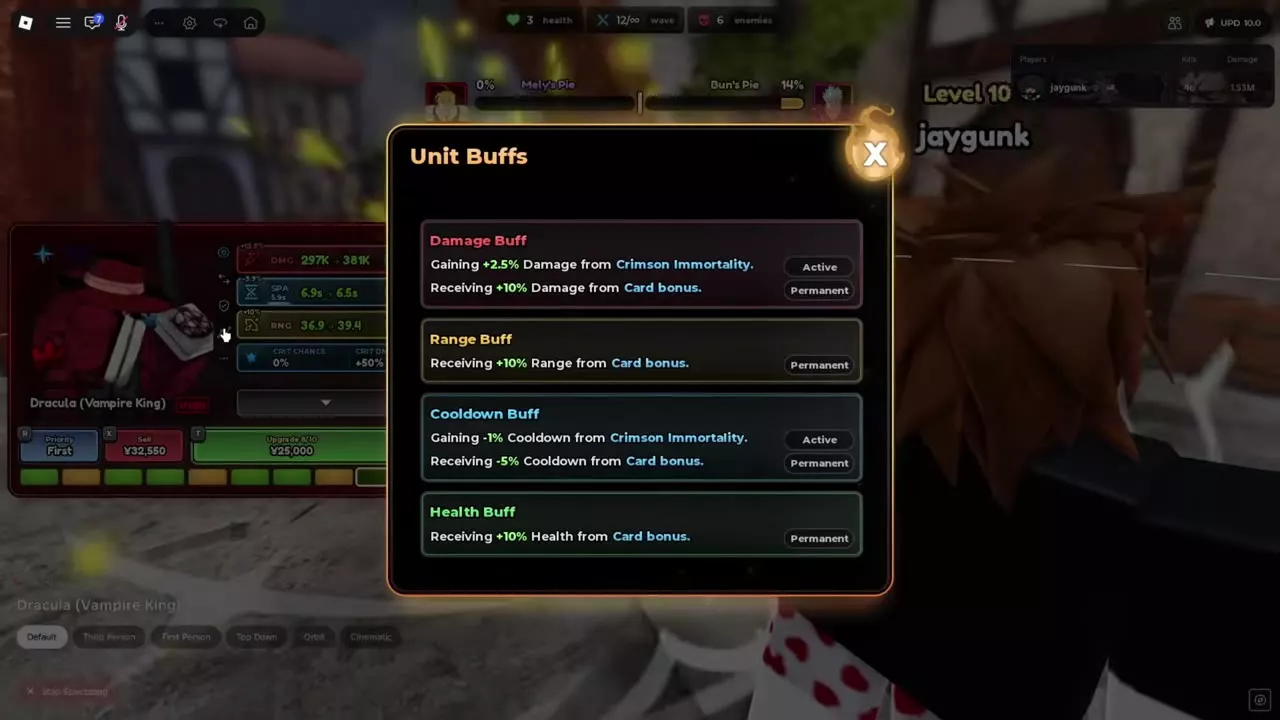
Open Unit Buffs beside the selected unit's panel. Entries identify the affected stat, effect source and Active or Permanent status. No Buffs means no effect is currently affecting that unit.
For example, Dracula's Kitchen Madness buff state includes Active Crimson Immortality effects of +2.5% Damage and -1% Cooldown. Its Permanent Card bonus entries are +10% Damage, +10% Range, -5% Cooldown and +10% Health. These entries describe that unit's current state; inspect the panel again after its effects change.
Read DPS Check
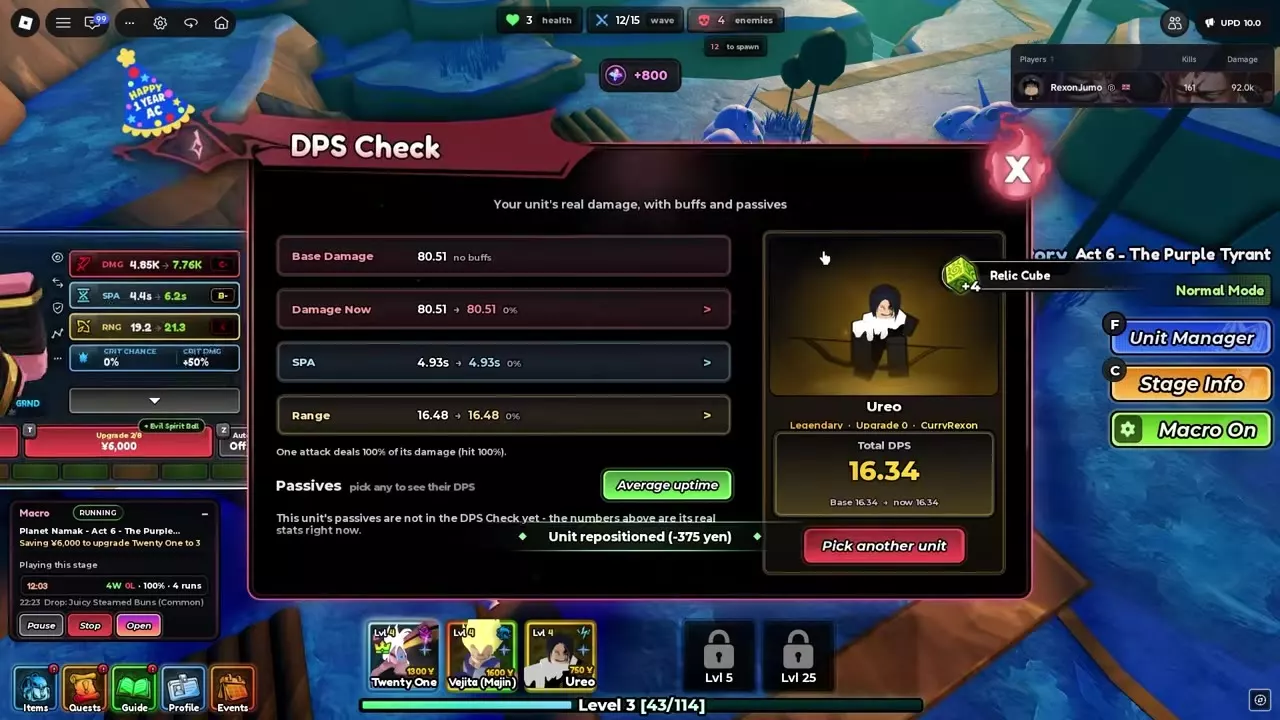
Open DPS Check for Base Damage, Damage Now, SPA, Range, Passives, Average uptime and Total DPS. Use Pick another unit to change the selection. Read the passive information alongside the total when deciding what the calculation includes.
In the Ureo Upgrade 0 example, Base Damage and Damage Now are both 80.51, SPA is 4.93 seconds, Range is 16.48 and Total DPS is 16.34. Each attack deals 100% of its damage, with a displayed 100% hit rate. Ureo's passives are excluded from this configuration's DPS Check, so the displayed total reflects its live stats without those passive contributions.
Track enemies and the stage
Damage-number colors identify damage types, while exclamation marks identify critical tiers. Burn, Black Burn and Toxic ticks display their own damage numbers. Enemy health bars show debuff timers, helping you track when an effect ends.
Open Stage Info for the mode, difficulty, map, wave progress and next boss, plus Session Stats, Stage Rewards and Stage Bosses. Watch the minimap warning when an enemy approaches the base.
Spectate a unit
Unit spectating offers Default, Third Person, First Person, Top Down, Orbit and Cinematic camera choices. Drag to look around, scroll the mouse wheel to zoom, and select Stop Spectating to leave.
Testing and team choices
- Use the Testing Zone and Sandbox controls to set up units and enemies, adjust test conditions and inspect combat readouts.
- Open Settings and Controls to change keybinds, HUD layout, health-bar displays and automatic unit abilities.
- Follow the team-building guide to match Physical or Magic support to your damage core, budget farm placements and cover Flying enemies.